Skip to main contentSkip to main content
~/profileLIVE
Asad Saeed
Asad SaeedOpen to WorkSenior Software Engineer | Full Stack Developer
01

Identity

Residence
Lahore, Punjab
Nationality
Pakistani
City
Lahore
Age
26
02

Languages

  • English96%
  • Urdu100%
03

Expertise

React.js95%
Next.js95%
JavaScript / TypeScript95%
HTML5, CSS395%
Tailwind, Bootstrap, Shadcn UI95%
Material UI, SCSS, Styled Components90%
Redux Toolkit, React Query, Zustand92%
REST & GraphQL APIs92%
Git, GitHub, Bitbucket98%
Node.js, Express.js, NestJS85%
MongoDB, PostgreSQL, Prisma80%
WebSockets, Real-Time Systems82%
AI & Automation (n8n, OpenAI)78%
04

Stack

4949 technologies
ReactJSNextJSJavaScriptTypeScriptReact NativeNestJSNode.jsExpress.jsMongoDBPostgreSQLMySQLPrisma ORMFirebaseREST APIGraphQL APIApollo ClientWebSockets / Socket.ioReduxRedux ToolkitReact QueryZustandTailwind CSSShadcn UIMaterial UIBootstrapSCSSCSSModule.cssStyled ComponentsFramer MotionStripe Payment Integrationn8nOpenAI APIAWS LambdaDockerVercelNetlifyGitHub Actions (CI/CD)JestGitGitHubBitbucketPostmanSwaggerJira SoftwareStrapiSanityFigmaAdobe XD
05

Contact

Email
asadsaeed.dev@gmail.com
Phone
+92 3017631644·+92 478730644
Download Resume
HomeSkillsBackgroundPortfolioContact
Chat with Asad
All Posts
How to Deploy a MERN Application Using AWS S3, CloudFront and EC2

How to Deploy a MERN Application Using AWS S3, CloudFront and EC2

AWSAMAZON S3AMAZON CLOUDFRONTAMAZON EC2MERN STACKASAD SAEED
November 2, 202616 min readBy Asad Saeed

Learn how to deploy a MERN Stack application on AWS using S3, CloudFront, and EC2. Configure React hosting, Node.js, Express, Nginx, HTTPS, MongoDB Atlas, and CI/CD.

Introduction

Building a MERN Stack application is only one part of the development process.

Once your React frontend, Node.js backend, Express APIs, and MongoDB database are ready, the next challenge is deploying everything into a production environment.

You need somewhere to host your frontend, somewhere to run your backend, a way to deliver static assets quickly, a secure connection between services, and a reliable database connection.

This is where AWS services such as Amazon S3, CloudFront, and EC2 become useful.

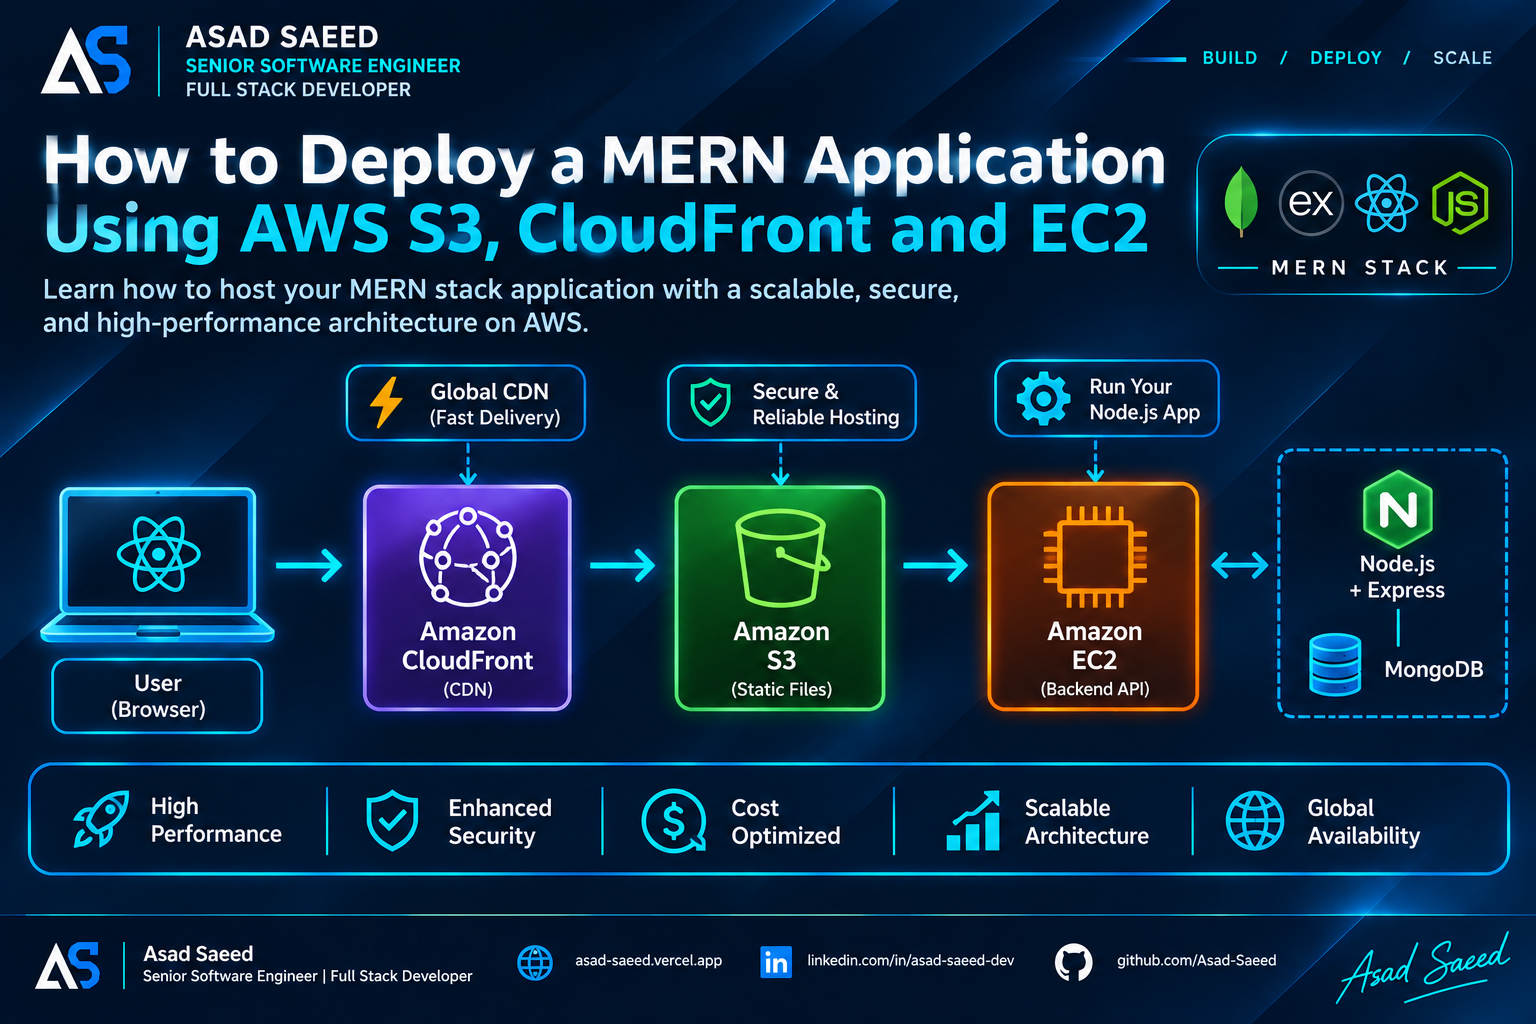
Instead of hosting the entire application on one server, we can separate the frontend and backend responsibilities:

  • Amazon S3: Stores the production React build.

  • Amazon CloudFront: Delivers frontend assets through a global CDN.

  • Amazon EC2: Runs the Node.js and Express backend.

  • MongoDB Atlas: Stores application data.

  • Nginx: Acts as a reverse proxy for the backend API.

In this guide, we'll understand the complete architecture and deploy a MERN application step by step.

By the end, you'll understand how a real production request travels from the browser to AWS infrastructure and eventually reaches your backend and database.

1. Understanding the AWS Deployment Architecture

Before deploying anything, let's understand how the services communicate.

Imagine a MERN application with the following structure:

                    USER
                     |
                     v
              example.com
                     |
                     v
               CLOUDFRONT
                (AWS CDN)
                     |
            +--------+--------+
            |                 |
            v                 v
       S3 ORIGIN          EC2 ORIGIN
     React Frontend      Backend API
            |                 |
            v                 v
      Static Assets       Nginx
                              |
                              v
                       Node.js + Express
                              |
                              v
                         MongoDB Atlas

This is a logical architecture, not a requirement to send every request through S3 and then EC2.

CloudFront can route requests to different origins based on URL path patterns.

For example:

Request pathOriginPurpose/S3React application/assets/*S3JavaScript, CSS, images/api/*EC2Backend API/api/auth/*EC2Authentication endpoints

CloudFront acts as the entry point and decides which origin should receive each request.

Why separate the frontend and backend?

There are several advantages:

Independent deployments: You can update your React application without restarting your Node.js backend.

Better static asset delivery: CloudFront caches frontend assets at edge locations closer to users.

Resource separation: Frontend traffic and backend processing are handled by different services.

Flexible scaling: You can optimize frontend delivery and backend compute resources independently.

Improved security: S3 can remain private while CloudFront provides controlled access to frontend files.

2. Preparing the MERN Application

Let's assume our project has this structure:

mern-production-app/
│
├── client/
│   ├── src/
│   ├── public/
│   ├── package.json
│   └── vite.config.js
│
└── server/
    ├── src/
    ├── package.json
    ├── index.js
    └── .env

The client directory contains the React frontend.

The server directory contains the Node.js and Express backend.

First, make sure your backend uses an environment variable for its port and database connection.

Example:

// server/index.js

import express from "express";
import cors from "cors";
import dotenv from "dotenv";

dotenv.config();

const app = express();

app.use(express.json());

app.use(cors({
  origin: process.env.CLIENT_URL,
}));

app.get("/api/health", (req, res) => {
  res.json({
    status: "healthy",
    message: "Backend is running",
  });
});

const PORT = process.env.PORT || 5000;

app.listen(PORT, "127.0.0.1", () => {
  console.log(`Server running on port ${PORT}`);
});

Your production environment file might contain:

PORT=5000
MONGODB_URI=mongodb+srv://...
CLIENT_URL=https://example.com
NODE_ENV=production

Do not commit this file to Git or expose database credentials in frontend code.

For the React application, configure the API base URL.

For example:

VITE_API_URL=https://example.com/api

Then use it in your frontend:

const API_URL = import.meta.env.VITE_API_URL;

export async function getUsers() {
  const response = await fetch(`${API_URL}/users`);

  if (!response.ok) {
    throw new Error("Unable to fetch users");
  }

  return response.json();
}

Remember that Vite environment variables prefixed with VITE_ are included in the client bundle. Never put secrets in them.

3. Creating an AWS S3 Bucket for React

Amazon S3 is an object storage service.

It stores files such as images, documents, JavaScript bundles, CSS files, and other static assets.

For our MERN application, we'll use S3 to store the production React build.

Step 1: Create an S3 bucket

Open the AWS Management Console.

Navigate to:

S3 → Buckets → Create bucket

Choose a unique bucket name, for example:

asad-mern-production-frontend

Select your preferred AWS Region.

For a CloudFront-based private-origin deployment, keep Block Public Access enabled.

We'll configure CloudFront to access the bucket using Origin Access Control (OAC).

Step 2: Build the React application

Navigate to your frontend directory:

cd client

Install dependencies:

npm install

Create the production build:

npm run build

For a Vite application, this normally generates:

client/
└── dist/
    ├── index.html
    ├── assets/
    │   ├── index-abc123.js
    │   └── index-def456.css
    └── favicon.ico

The dist directory contains the optimized production files.

Step 3: Upload the build to S3

You can upload the build through the AWS Console or AWS CLI.

First, configure AWS CLI credentials securely using an IAM identity or role.

Then run:

aws s3 sync dist/ \
  s3://asad-mern-production-frontend \
  --delete

What does this command do?

  • aws s3 sync: Synchronizes local files with the S3 bucket.

  • dist/: Specifies the production build directory.

  • s3://...: Specifies the destination bucket.

  • --delete: Removes destination objects that no longer exist locally.

Be careful with --delete: it can remove files from your bucket. Use it only when the target bucket is dedicated to the frontend build.

Your React application is now stored in S3.

However, users should not need to access the bucket directly.

That's where CloudFront comes in.

4. Configuring CloudFront as a CDN

Amazon CloudFront is a Content Delivery Network (CDN).

It distributes content through a global network of edge locations.

When a user requests a frontend asset, CloudFront can serve a cached copy from an edge location instead of fetching it from the S3 origin every time.

For example:

       User in Pakistan
              |
              v
       CloudFront Edge
              |
        Cache Available?
          /       \
        Yes        No
         |          |
         v          v
    Return File   Fetch from S3
         |          |
         |       Cache File
         |          |
         +-----+----+
               |
               v
          Return Response

This reduces repeated origin requests and can improve content delivery latency.

Step 1: Create a CloudFront distribution

Navigate to:

CloudFront → Distributions → Create distribution

Choose your S3 bucket as the origin.

For security, configure Origin Access Control (OAC).

OAC allows CloudFront to access a private S3 bucket without making the bucket publicly accessible.

Step 2: Configure S3 bucket permissions

CloudFront needs permission to read the frontend objects.

Use the bucket policy generated for your distribution or configure a policy that grants s3:GetObject to the specific CloudFront distribution.

Conceptually:

{
  "Version": "2012-10-17",
  "Statement": [
    {
      "Sid": "AllowCloudFrontReadOnly",
      "Effect": "Allow",
      "Principal": {
        "Service": "cloudfront.amazonaws.com"
      },
      "Action": "s3:GetObject",
      "Resource": "arn:aws:s3:::asad-mern-production-frontend/*",
      "Condition": {
        "StringEquals": {
          "AWS:SourceArn": "arn:aws:cloudfront::ACCOUNT_ID:distribution/DISTRIBUTION_ID"
        }
      }
    }
  ]
}

Replace the account ID and distribution ID with your actual values.

Step 3: Configure the default root object

Set:

index.html

This tells CloudFront which file to return when users visit the root URL.

Step 4: Configure SPA routing

React applications often use client-side routing.

For example:

/dashboard
/profile
/settings

These routes may not correspond to actual files inside S3.

If a user refreshes /dashboard, the origin may return a 403 or 404 because no physical /dashboard object exists.

For a client-side React application, configure CloudFront to serve index.html for appropriate frontend route errors.

Be careful not to rewrite API errors to index.html.

A better approach is to separate frontend and API behaviors so that only frontend navigation requests use the SPA fallback.

5. Deploying the Node.js Backend on EC2

Now let's deploy the Express backend.

Amazon EC2 provides virtual servers in the AWS cloud.

Unlike Lambda, an EC2 instance runs your application continuously until you stop or terminate the instance.

This makes EC2 useful for applications requiring persistent processes, long-running tasks, or server-level configuration.

Step 1: Launch an EC2 instance

Navigate to:

EC2 → Instances → Launch instance

Choose:

  • Instance name: mern-production-api

  • Operating system: Ubuntu Server LTS

  • Instance type: Select according to workload and budget

  • Key pair: Create or select an SSH key pair

  • Storage: Configure according to application requirements

For a small application, you can begin with a modest instance and monitor resource utilization.

Step 2: Configure security groups

Security groups act as virtual firewalls for EC2 instances.

For our setup, the inbound rules might look like this:

PortSourcePurpose22Your trusted IPSSH administration80Appropriate network sourceHTTP, if Nginx serves it443Appropriate network sourceHTTPS, if TLS terminates on EC25000No public accessInternal Node.js application

If CloudFront is the public entry point and Nginx receives API traffic, do not expose port 5000 publicly.

For stronger isolation, consider an Application Load Balancer or a controlled CloudFront-to-backend origin design.

Step 3: Connect to EC2

Use SSH:

ssh -i your-key.pem ubuntu@YOUR_EC2_PUBLIC_IP

Update system packages:

sudo apt update
sudo apt upgrade -y

Install Node.js using a trusted installation method appropriate for your selected version.

Verify the installation:

node -v
npm -v

Step 4: Deploy backend code

Clone your repository:

git clone https://github.com/your-username/mern-production-app.git

Navigate to the backend:

cd mern-production-app/server

Install production dependencies:

npm ci --omit=dev

Configure your production environment variables securely.

For example:

NODE_ENV=production
PORT=5000
MONGODB_URI=your-production-mongodb-uri
CLIENT_URL=https://example.com

In a real production environment, use a managed secrets solution such as AWS Systems Manager Parameter Store or AWS Secrets Manager rather than keeping sensitive credentials in a repository.

Step 5: Run the application with PM2

PM2 is a process manager for Node.js applications.

It can keep your application running, restart it after crashes, and provide process logs.

Install PM2:

sudo npm install -g pm2

Start your backend:

pm2 start index.js --name mern-api

Check running processes:

pm2 list

View logs:

pm2 logs mern-api

Save the process list:

pm2 save

Configure PM2 startup:

pm2 startup

Run the command PM2 prints to enable startup on system boot.

Now your Node.js application can run as a managed background process.

6. Configuring Nginx as a Reverse Proxy

Your Express application is listening on:

127.0.0.1:5000

But users should not access that internal port directly.

Nginx can receive HTTP requests and forward them to the Node.js application.

This is called reverse proxying.

Install Nginx:

sudo apt install nginx -y

Create a configuration file:

sudo nano /etc/nginx/sites-available/mern-api

Add:

server {
    listen 80;

    server_name api.example.com;

    location / {
        proxy_pass http://127.0.0.1:5000;

        proxy_http_version 1.1;

        proxy_set_header Host $host;
        proxy_set_header X-Real-IP $remote_addr;
        proxy_set_header X-Forwarded-For $proxy_add_x_forwarded_for;
        proxy_set_header X-Forwarded-Proto $scheme;
    }
}

Enable the configuration:

sudo ln -s \
  /etc/nginx/sites-available/mern-api \
  /etc/nginx/sites-enabled/

Test the configuration:

sudo nginx -t

Reload Nginx:

sudo systemctl reload nginx

Now Nginx forwards incoming requests to Express.

For a production HTTPS setup, terminate TLS at CloudFront or an Application Load Balancer, or configure TLS directly on Nginx. Ensure the origin connection is encrypted and that the origin cannot be accessed through an unintended public route.

7. Connecting CloudFront to Both S3 and EC2

This is where the complete architecture comes together.

CloudFront supports multiple origins and cache behaviors.

We can configure:

Origin 1: S3

asad-mern-production-frontend

Origin 2: EC2 backend

api.example.com

Then configure path-based behaviors.

Path patternOriginHTTP methodsDefault *S3GET, HEAD, OPTIONS/api/*EC2Methods required by your API

For the API behavior:

  • Forward the required authorization headers.

  • Forward query strings.

  • Forward cookies if your authentication uses them.

  • Configure an appropriate cache policy.

  • Disable caching for sensitive dynamic API responses unless explicitly designed otherwise.

  • Allow the HTTP methods your backend needs.

For authentication endpoints and user-specific responses, caching should generally be disabled or carefully configured to prevent one user's response from being served to another user.

The request flow now looks like:

Browser
   |
   v
CloudFront
   |
   +---------------------+
   |                     |
   v                     v
Default Behavior      /api/*
   |                     |
   v                     v
Private S3 Origin     EC2 / Nginx
   |                     |
   v                     v
React Build           Express API
                         |
                         v
                    MongoDB Atlas

This separation is one of the most useful features of this architecture.

The frontend and backend share one public entry point while remaining independently hosted.

8. Configuring HTTPS and a Custom Domain

A production application should use HTTPS.

AWS Certificate Manager (ACM) can provide SSL/TLS certificates for supported AWS integrations.

For a custom domain such as:

example.com

and:

www.example.com

you can configure:

  1. A custom domain in CloudFront.

  2. A validated ACM certificate in the us-east-1 Region for CloudFront.

  3. DNS records pointing the domain to the CloudFront distribution.

  4. Appropriate origin security and HTTPS settings.

If you use an Application Load Balancer for your EC2 backend, its ACM certificate must be in the same Region as the load balancer.

For a direct EC2 origin, you can configure HTTPS at Nginx using an appropriate certificate.

Do not assume that HTTPS between the browser and CloudFront automatically encrypts the connection between CloudFront and your origin. Configure the origin protocol policy correctly.

9. Connecting MongoDB Atlas

Our Express application now runs on EC2.

The next step is connecting it to MongoDB Atlas.

MongoDB Atlas is a managed MongoDB database service.

Instead of installing and managing MongoDB directly on your EC2 instance, Atlas handles much of the database infrastructure.

Step 1: Create a MongoDB Atlas cluster

Create a cluster and configure your database user.

Step 2: Configure network access

Allow your EC2 instance to connect to Atlas.

For production, prefer private connectivity where supported or an appropriate stable outbound IP with a narrowly scoped network access rule.

Avoid allowing access from 0.0.0.0/0 simply to make the connection work.

Step 3: Configure the connection string

Add the connection string to your backend's secret configuration:

MONGODB_URI=mongodb+srv://...

Then connect through your Node.js application:

import mongoose from "mongoose";

export async function connectDatabase() {
  try {
    await mongoose.connect(process.env.MONGODB_URI);

    console.log("MongoDB connected successfully");
  } catch (error) {
    console.error("MongoDB connection failed:", error);

    process.exit(1);
  }
}

Call connectDatabase() during application startup before accepting requests.

Now the backend can read and write application data through MongoDB Atlas.

10. What Happens When You Deploy a New Version?

Imagine you update your React dashboard and fix a backend API issue.

How do you deploy the changes?

The frontend and backend can be deployed independently.

Frontend deployment

Build the updated React application:

cd client

npm run build

Upload the new build:

aws s3 sync dist/ \
  s3://asad-mern-production-frontend \
  --delete

Then invalidate the relevant CloudFront cache:

aws cloudfront create-invalidation \
  --distribution-id YOUR_DISTRIBUTION_ID \
  --paths "/*"

In production, use content-hashed asset filenames and long-lived caching for immutable assets. Keep index.html on a short or no-cache policy so users receive the latest application entry point.

Backend deployment

Connect to EC2 and update your code:

cd mern-production-app/server

git pull origin main

npm ci --omit=dev

Restart the application:

pm2 restart mern-api

For production deployments, use a CI/CD pipeline and a deployment strategy that keeps the API available during updates. A rolling or blue-green deployment with multiple instances is more reliable than restarting the only running process.

11. Automating Deployment with CI/CD

Manually deploying every update becomes difficult as an application grows.

You can automate deployment using GitHub Actions.

A typical pipeline looks like:

Developer Pushes Code
         |
         v
    GitHub Repository
         |
         v
    GitHub Actions
         |
         v
     Install Packages
         |
         v
      Run Tests
         |
         v
      Build React
         |
         v
       Upload to S3
         |
         v
   Invalidate CloudFront
         |
         v
     Deploy Backend
         |
         v
     Verify Deployment

A frontend workflow can build the React application and upload its output to S3.

For authentication, use GitHub Actions OIDC with an appropriately restricted AWS IAM role instead of long-lived AWS access keys.

For backend deployment, you can use AWS Systems Manager, a controlled deployment runner, or another secure deployment mechanism.

The goal is to make deployments repeatable, predictable, and less dependent on manual server access.

12. Common Production Problems

Deploying an application successfully does not mean everything will work perfectly.

Here are some issues developers commonly encounter.

Problem 1: React routes return 403 or 404 after refresh

Cause: S3 does not contain a physical file for every client-side route.

Solution: Configure CloudFront SPA routing fallback for frontend navigation while keeping API errors separate.

Problem 2: API requests fail because of CORS

Cause: The backend does not allow the frontend's actual origin, or browser requests use an incorrect origin or credentials configuration.

Solution: Configure Express CORS for the correct frontend domain and authentication method.

Problem 3: CloudFront keeps serving an old frontend build

Cause: Cached objects have not expired or been invalidated.

Solution: Use content-hashed asset filenames, appropriate cache headers, and targeted invalidations when needed.

Problem 4: EC2 backend stops responding

Cause: The process crashed, the instance ran out of resources, or networking and security rules are incorrect.

Solution: Monitor application logs, EC2 metrics, process health, and infrastructure alerts. Use an appropriate process manager and recovery strategy.

Problem 5: MongoDB connection fails

Cause: Incorrect credentials, network access restrictions, DNS issues, or connection limits.

Solution: Verify the connection string, Atlas network access, database user permissions, and outbound connectivity.

Problem 6: API requests receive 502 or 504 errors

Cause: Nginx cannot reach the backend, or the upstream service takes too long to respond.

Solution: Check PM2 logs, Nginx logs, backend health endpoints, and timeout settings.

13. Security and Production Best Practices

Before making your application publicly available, consider these practices:

AWS security

  • Use IAM roles instead of hardcoded AWS credentials.

  • Keep the S3 bucket private with CloudFront OAC.

  • Restrict EC2 security group rules.

  • Avoid exposing the Node.js application port publicly.

  • Store secrets in AWS Secrets Manager or Systems Manager Parameter Store.

Application security

  • Use HTTPS.

  • Validate incoming requests.

  • Configure CORS carefully.

  • Apply authentication and authorization on backend routes.

  • Never expose database credentials in frontend bundles.

Performance

  • Use CloudFront caching for static assets.

  • Enable compression where appropriate.

  • Use content-hashed filenames.

  • Optimize React bundle size.

  • Monitor EC2 CPU, memory, disk, and network usage.

Reliability

  • Configure application health checks.

  • Monitor CloudFront, EC2, and application logs.

  • Back up important database data.

  • Establish deployment rollback procedures.

  • Consider an Application Load Balancer and multiple EC2 instances when higher availability is required.

14. Is This Architecture Suitable for Every MERN Application?

Not necessarily.

S3, CloudFront, and EC2 provide a practical architecture for applications that need separately hosted frontend and backend services.

However, the right architecture depends on traffic, reliability requirements, operational complexity, and budget.

For example:

RequirementPossible AWS solutionStatic React hostingS3 + CloudFrontNode.js backendEC2Managed container deploymentECS + FargateServerless API operationsLambda + API GatewayManaged relational databaseRDSObject storageS3Global content deliveryCloudFrontSecrets managementSecrets ManagerMonitoringCloudWatch

For a small or medium-sized application, a single EC2 instance may be a reasonable starting point.

For a high-availability production system, consider multiple EC2 instances behind an Application Load Balancer, automated scaling, deployment automation, and stronger monitoring.

The objective is not to use every AWS service.

It is to choose the services that solve your actual application requirements.

Final Thoughts

Deploying a MERN application on AWS is not simply about uploading frontend files and starting a Node.js server.

It involves understanding how different infrastructure components communicate and how each service contributes to the complete application.

Amazon S3 stores and serves the frontend assets. CloudFront delivers those assets globally and routes requests to the appropriate origin. EC2 runs the backend application, Nginx forwards API requests, and MongoDB Atlas stores application data.

Once these components are configured correctly, you have a practical production architecture with independent frontend and backend deployments.

As full-stack developers, understanding deployment architecture is just as important as writing application code.

A production-ready application is not only one that works locally. It is one that can be deployed, secured, monitored, maintained, and scaled reliably.

About the Author

Asad Saeed | Senior Software Engineer | Full Stack Developer

I share practical insights on backend engineering, MERN Stack development, distributed systems, database architecture, cloud computing, and building reliable production applications.

Asad Saeed

Asad Saeed

Senior Software Engineer | Full Stack Developer

More posts →

Related Posts

Don't Stop Here

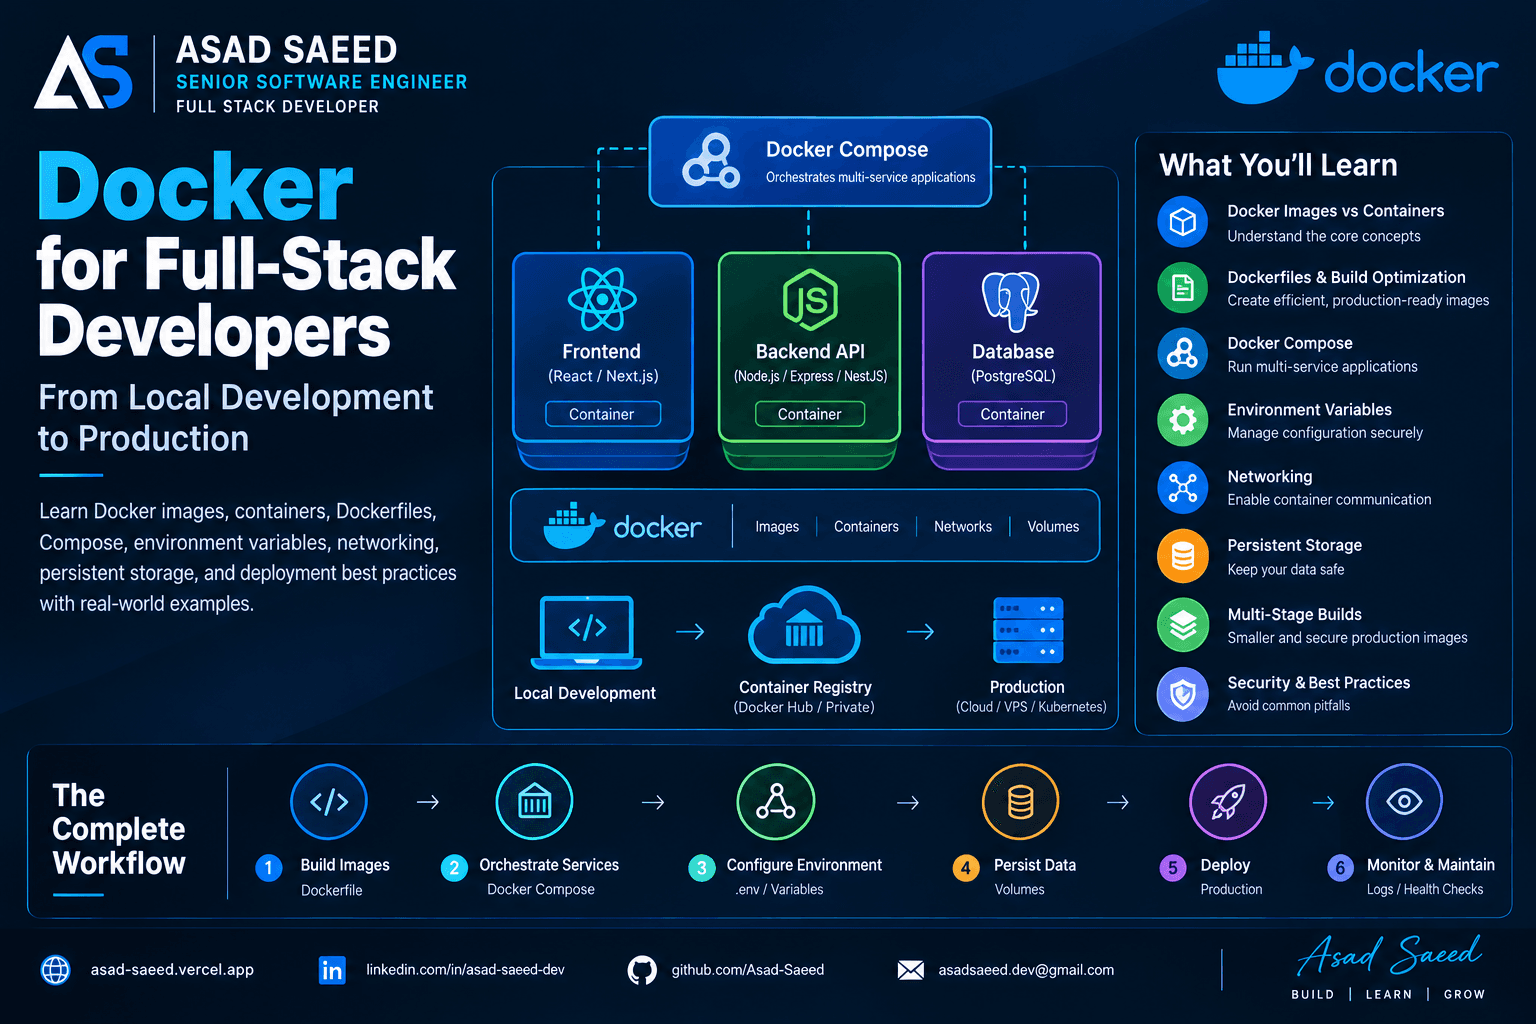
Docker for Full-Stack Developers: Complete Guide (2026)

Docker for Full-Stack Developers: Complete Guide (2026)

Learn Docker for full-stack development with practical examples covering Dockerfiles, images, containers, Docker Compose, networking, environment variables, volumes, and production deployment.

DOCKERDEVOPSSOFTWARE ENGINEERING
© 2026 · Asad Saeed
All Posts
How to Deploy a MERN Application Using AWS S3, CloudFront and EC2

How to Deploy a MERN Application Using AWS S3, CloudFront and EC2

AWSAMAZON S3AMAZON CLOUDFRONTAMAZON EC2MERN STACKASAD SAEED
November 2, 202616 min readBy Asad Saeed

Learn how to deploy a MERN Stack application on AWS using S3, CloudFront, and EC2. Configure React hosting, Node.js, Express, Nginx, HTTPS, MongoDB Atlas, and CI/CD.

Introduction

Building a MERN Stack application is only one part of the development process.

Once your React frontend, Node.js backend, Express APIs, and MongoDB database are ready, the next challenge is deploying everything into a production environment.

You need somewhere to host your frontend, somewhere to run your backend, a way to deliver static assets quickly, a secure connection between services, and a reliable database connection.

This is where AWS services such as Amazon S3, CloudFront, and EC2 become useful.

Instead of hosting the entire application on one server, we can separate the frontend and backend responsibilities:

  • Amazon S3: Stores the production React build.

  • Amazon CloudFront: Delivers frontend assets through a global CDN.

  • Amazon EC2: Runs the Node.js and Express backend.

  • MongoDB Atlas: Stores application data.

  • Nginx: Acts as a reverse proxy for the backend API.

In this guide, we'll understand the complete architecture and deploy a MERN application step by step.

By the end, you'll understand how a real production request travels from the browser to AWS infrastructure and eventually reaches your backend and database.

1. Understanding the AWS Deployment Architecture

Before deploying anything, let's understand how the services communicate.

Imagine a MERN application with the following structure:

                    USER
                     |
                     v
              example.com
                     |
                     v
               CLOUDFRONT
                (AWS CDN)
                     |
            +--------+--------+
            |                 |
            v                 v
       S3 ORIGIN          EC2 ORIGIN
     React Frontend      Backend API
            |                 |
            v                 v
      Static Assets       Nginx
                              |
                              v
                       Node.js + Express
                              |
                              v
                         MongoDB Atlas

This is a logical architecture, not a requirement to send every request through S3 and then EC2.

CloudFront can route requests to different origins based on URL path patterns.

For example:

Request pathOriginPurpose/S3React application/assets/*S3JavaScript, CSS, images/api/*EC2Backend API/api/auth/*EC2Authentication endpoints

CloudFront acts as the entry point and decides which origin should receive each request.

Why separate the frontend and backend?

There are several advantages:

Independent deployments: You can update your React application without restarting your Node.js backend.

Better static asset delivery: CloudFront caches frontend assets at edge locations closer to users.

Resource separation: Frontend traffic and backend processing are handled by different services.

Flexible scaling: You can optimize frontend delivery and backend compute resources independently.

Improved security: S3 can remain private while CloudFront provides controlled access to frontend files.

2. Preparing the MERN Application

Let's assume our project has this structure:

mern-production-app/
│
├── client/
│   ├── src/
│   ├── public/
│   ├── package.json
│   └── vite.config.js
│
└── server/
    ├── src/
    ├── package.json
    ├── index.js
    └── .env

The client directory contains the React frontend.

The server directory contains the Node.js and Express backend.

First, make sure your backend uses an environment variable for its port and database connection.

Example:

// server/index.js

import express from "express";
import cors from "cors";
import dotenv from "dotenv";

dotenv.config();

const app = express();

app.use(express.json());

app.use(cors({
  origin: process.env.CLIENT_URL,
}));

app.get("/api/health", (req, res) => {
  res.json({
    status: "healthy",
    message: "Backend is running",
  });
});

const PORT = process.env.PORT || 5000;

app.listen(PORT, "127.0.0.1", () => {
  console.log(`Server running on port ${PORT}`);
});

Your production environment file might contain:

PORT=5000
MONGODB_URI=mongodb+srv://...
CLIENT_URL=https://example.com
NODE_ENV=production

Do not commit this file to Git or expose database credentials in frontend code.

For the React application, configure the API base URL.

For example:

VITE_API_URL=https://example.com/api

Then use it in your frontend:

const API_URL = import.meta.env.VITE_API_URL;

export async function getUsers() {
  const response = await fetch(`${API_URL}/users`);

  if (!response.ok) {
    throw new Error("Unable to fetch users");
  }

  return response.json();
}

Remember that Vite environment variables prefixed with VITE_ are included in the client bundle. Never put secrets in them.

3. Creating an AWS S3 Bucket for React

Amazon S3 is an object storage service.

It stores files such as images, documents, JavaScript bundles, CSS files, and other static assets.

For our MERN application, we'll use S3 to store the production React build.

Step 1: Create an S3 bucket

Open the AWS Management Console.

Navigate to:

S3 → Buckets → Create bucket

Choose a unique bucket name, for example:

asad-mern-production-frontend

Select your preferred AWS Region.

For a CloudFront-based private-origin deployment, keep Block Public Access enabled.

We'll configure CloudFront to access the bucket using Origin Access Control (OAC).

Step 2: Build the React application

Navigate to your frontend directory:

cd client

Install dependencies:

npm install

Create the production build:

npm run build

For a Vite application, this normally generates:

client/
└── dist/
    ├── index.html
    ├── assets/
    │   ├── index-abc123.js
    │   └── index-def456.css
    └── favicon.ico

The dist directory contains the optimized production files.

Step 3: Upload the build to S3

You can upload the build through the AWS Console or AWS CLI.

First, configure AWS CLI credentials securely using an IAM identity or role.

Then run:

aws s3 sync dist/ \
  s3://asad-mern-production-frontend \
  --delete

What does this command do?

  • aws s3 sync: Synchronizes local files with the S3 bucket.

  • dist/: Specifies the production build directory.

  • s3://...: Specifies the destination bucket.

  • --delete: Removes destination objects that no longer exist locally.

Be careful with --delete: it can remove files from your bucket. Use it only when the target bucket is dedicated to the frontend build.

Your React application is now stored in S3.

However, users should not need to access the bucket directly.

That's where CloudFront comes in.

4. Configuring CloudFront as a CDN

Amazon CloudFront is a Content Delivery Network (CDN).

It distributes content through a global network of edge locations.

When a user requests a frontend asset, CloudFront can serve a cached copy from an edge location instead of fetching it from the S3 origin every time.

For example:

       User in Pakistan
              |
              v
       CloudFront Edge
              |
        Cache Available?
          /       \
        Yes        No
         |          |
         v          v
    Return File   Fetch from S3
         |          |
         |       Cache File
         |          |
         +-----+----+
               |
               v
          Return Response

This reduces repeated origin requests and can improve content delivery latency.

Step 1: Create a CloudFront distribution

Navigate to:

CloudFront → Distributions → Create distribution

Choose your S3 bucket as the origin.

For security, configure Origin Access Control (OAC).

OAC allows CloudFront to access a private S3 bucket without making the bucket publicly accessible.

Step 2: Configure S3 bucket permissions

CloudFront needs permission to read the frontend objects.

Use the bucket policy generated for your distribution or configure a policy that grants s3:GetObject to the specific CloudFront distribution.

Conceptually:

{
  "Version": "2012-10-17",
  "Statement": [
    {
      "Sid": "AllowCloudFrontReadOnly",
      "Effect": "Allow",
      "Principal": {
        "Service": "cloudfront.amazonaws.com"
      },
      "Action": "s3:GetObject",
      "Resource": "arn:aws:s3:::asad-mern-production-frontend/*",
      "Condition": {
        "StringEquals": {
          "AWS:SourceArn": "arn:aws:cloudfront::ACCOUNT_ID:distribution/DISTRIBUTION_ID"
        }
      }
    }
  ]
}

Replace the account ID and distribution ID with your actual values.

Step 3: Configure the default root object

Set:

index.html

This tells CloudFront which file to return when users visit the root URL.

Step 4: Configure SPA routing

React applications often use client-side routing.

For example:

/dashboard
/profile
/settings

These routes may not correspond to actual files inside S3.

If a user refreshes /dashboard, the origin may return a 403 or 404 because no physical /dashboard object exists.

For a client-side React application, configure CloudFront to serve index.html for appropriate frontend route errors.

Be careful not to rewrite API errors to index.html.

A better approach is to separate frontend and API behaviors so that only frontend navigation requests use the SPA fallback.

5. Deploying the Node.js Backend on EC2

Now let's deploy the Express backend.

Amazon EC2 provides virtual servers in the AWS cloud.

Unlike Lambda, an EC2 instance runs your application continuously until you stop or terminate the instance.

This makes EC2 useful for applications requiring persistent processes, long-running tasks, or server-level configuration.

Step 1: Launch an EC2 instance

Navigate to:

EC2 → Instances → Launch instance

Choose:

  • Instance name: mern-production-api

  • Operating system: Ubuntu Server LTS

  • Instance type: Select according to workload and budget

  • Key pair: Create or select an SSH key pair

  • Storage: Configure according to application requirements

For a small application, you can begin with a modest instance and monitor resource utilization.

Step 2: Configure security groups

Security groups act as virtual firewalls for EC2 instances.

For our setup, the inbound rules might look like this:

PortSourcePurpose22Your trusted IPSSH administration80Appropriate network sourceHTTP, if Nginx serves it443Appropriate network sourceHTTPS, if TLS terminates on EC25000No public accessInternal Node.js application

If CloudFront is the public entry point and Nginx receives API traffic, do not expose port 5000 publicly.

For stronger isolation, consider an Application Load Balancer or a controlled CloudFront-to-backend origin design.

Step 3: Connect to EC2

Use SSH:

ssh -i your-key.pem ubuntu@YOUR_EC2_PUBLIC_IP

Update system packages:

sudo apt update
sudo apt upgrade -y

Install Node.js using a trusted installation method appropriate for your selected version.

Verify the installation:

node -v
npm -v

Step 4: Deploy backend code

Clone your repository:

git clone https://github.com/your-username/mern-production-app.git

Navigate to the backend:

cd mern-production-app/server

Install production dependencies:

npm ci --omit=dev

Configure your production environment variables securely.

For example:

NODE_ENV=production
PORT=5000
MONGODB_URI=your-production-mongodb-uri
CLIENT_URL=https://example.com

In a real production environment, use a managed secrets solution such as AWS Systems Manager Parameter Store or AWS Secrets Manager rather than keeping sensitive credentials in a repository.

Step 5: Run the application with PM2

PM2 is a process manager for Node.js applications.

It can keep your application running, restart it after crashes, and provide process logs.

Install PM2:

sudo npm install -g pm2

Start your backend:

pm2 start index.js --name mern-api

Check running processes:

pm2 list

View logs:

pm2 logs mern-api

Save the process list:

pm2 save

Configure PM2 startup:

pm2 startup

Run the command PM2 prints to enable startup on system boot.

Now your Node.js application can run as a managed background process.

6. Configuring Nginx as a Reverse Proxy

Your Express application is listening on:

127.0.0.1:5000

But users should not access that internal port directly.

Nginx can receive HTTP requests and forward them to the Node.js application.

This is called reverse proxying.

Install Nginx:

sudo apt install nginx -y

Create a configuration file:

sudo nano /etc/nginx/sites-available/mern-api

Add:

server {
    listen 80;

    server_name api.example.com;

    location / {
        proxy_pass http://127.0.0.1:5000;

        proxy_http_version 1.1;

        proxy_set_header Host $host;
        proxy_set_header X-Real-IP $remote_addr;
        proxy_set_header X-Forwarded-For $proxy_add_x_forwarded_for;
        proxy_set_header X-Forwarded-Proto $scheme;
    }
}

Enable the configuration:

sudo ln -s \
  /etc/nginx/sites-available/mern-api \
  /etc/nginx/sites-enabled/

Test the configuration:

sudo nginx -t

Reload Nginx:

sudo systemctl reload nginx

Now Nginx forwards incoming requests to Express.

For a production HTTPS setup, terminate TLS at CloudFront or an Application Load Balancer, or configure TLS directly on Nginx. Ensure the origin connection is encrypted and that the origin cannot be accessed through an unintended public route.

7. Connecting CloudFront to Both S3 and EC2

This is where the complete architecture comes together.

CloudFront supports multiple origins and cache behaviors.

We can configure:

Origin 1: S3

asad-mern-production-frontend

Origin 2: EC2 backend

api.example.com

Then configure path-based behaviors.

Path patternOriginHTTP methodsDefault *S3GET, HEAD, OPTIONS/api/*EC2Methods required by your API

For the API behavior:

  • Forward the required authorization headers.

  • Forward query strings.

  • Forward cookies if your authentication uses them.

  • Configure an appropriate cache policy.

  • Disable caching for sensitive dynamic API responses unless explicitly designed otherwise.

  • Allow the HTTP methods your backend needs.

For authentication endpoints and user-specific responses, caching should generally be disabled or carefully configured to prevent one user's response from being served to another user.

The request flow now looks like:

Browser
   |
   v
CloudFront
   |
   +---------------------+
   |                     |
   v                     v
Default Behavior      /api/*
   |                     |
   v                     v
Private S3 Origin     EC2 / Nginx
   |                     |
   v                     v
React Build           Express API
                         |
                         v
                    MongoDB Atlas

This separation is one of the most useful features of this architecture.

The frontend and backend share one public entry point while remaining independently hosted.

8. Configuring HTTPS and a Custom Domain

A production application should use HTTPS.

AWS Certificate Manager (ACM) can provide SSL/TLS certificates for supported AWS integrations.

For a custom domain such as:

example.com

and:

www.example.com

you can configure:

  1. A custom domain in CloudFront.

  2. A validated ACM certificate in the us-east-1 Region for CloudFront.

  3. DNS records pointing the domain to the CloudFront distribution.

  4. Appropriate origin security and HTTPS settings.

If you use an Application Load Balancer for your EC2 backend, its ACM certificate must be in the same Region as the load balancer.

For a direct EC2 origin, you can configure HTTPS at Nginx using an appropriate certificate.

Do not assume that HTTPS between the browser and CloudFront automatically encrypts the connection between CloudFront and your origin. Configure the origin protocol policy correctly.

9. Connecting MongoDB Atlas

Our Express application now runs on EC2.

The next step is connecting it to MongoDB Atlas.

MongoDB Atlas is a managed MongoDB database service.

Instead of installing and managing MongoDB directly on your EC2 instance, Atlas handles much of the database infrastructure.

Step 1: Create a MongoDB Atlas cluster

Create a cluster and configure your database user.

Step 2: Configure network access

Allow your EC2 instance to connect to Atlas.

For production, prefer private connectivity where supported or an appropriate stable outbound IP with a narrowly scoped network access rule.

Avoid allowing access from 0.0.0.0/0 simply to make the connection work.

Step 3: Configure the connection string

Add the connection string to your backend's secret configuration:

MONGODB_URI=mongodb+srv://...

Then connect through your Node.js application:

import mongoose from "mongoose";

export async function connectDatabase() {
  try {
    await mongoose.connect(process.env.MONGODB_URI);

    console.log("MongoDB connected successfully");
  } catch (error) {
    console.error("MongoDB connection failed:", error);

    process.exit(1);
  }
}

Call connectDatabase() during application startup before accepting requests.

Now the backend can read and write application data through MongoDB Atlas.

10. What Happens When You Deploy a New Version?

Imagine you update your React dashboard and fix a backend API issue.

How do you deploy the changes?

The frontend and backend can be deployed independently.

Frontend deployment

Build the updated React application:

cd client

npm run build

Upload the new build:

aws s3 sync dist/ \
  s3://asad-mern-production-frontend \
  --delete

Then invalidate the relevant CloudFront cache:

aws cloudfront create-invalidation \
  --distribution-id YOUR_DISTRIBUTION_ID \
  --paths "/*"

In production, use content-hashed asset filenames and long-lived caching for immutable assets. Keep index.html on a short or no-cache policy so users receive the latest application entry point.

Backend deployment

Connect to EC2 and update your code:

cd mern-production-app/server

git pull origin main

npm ci --omit=dev

Restart the application:

pm2 restart mern-api

For production deployments, use a CI/CD pipeline and a deployment strategy that keeps the API available during updates. A rolling or blue-green deployment with multiple instances is more reliable than restarting the only running process.

11. Automating Deployment with CI/CD

Manually deploying every update becomes difficult as an application grows.

You can automate deployment using GitHub Actions.

A typical pipeline looks like:

Developer Pushes Code
         |
         v
    GitHub Repository
         |
         v
    GitHub Actions
         |
         v
     Install Packages
         |
         v
      Run Tests
         |
         v
      Build React
         |
         v
       Upload to S3
         |
         v
   Invalidate CloudFront
         |
         v
     Deploy Backend
         |
         v
     Verify Deployment

A frontend workflow can build the React application and upload its output to S3.

For authentication, use GitHub Actions OIDC with an appropriately restricted AWS IAM role instead of long-lived AWS access keys.

For backend deployment, you can use AWS Systems Manager, a controlled deployment runner, or another secure deployment mechanism.

The goal is to make deployments repeatable, predictable, and less dependent on manual server access.

12. Common Production Problems

Deploying an application successfully does not mean everything will work perfectly.

Here are some issues developers commonly encounter.

Problem 1: React routes return 403 or 404 after refresh

Cause: S3 does not contain a physical file for every client-side route.

Solution: Configure CloudFront SPA routing fallback for frontend navigation while keeping API errors separate.

Problem 2: API requests fail because of CORS

Cause: The backend does not allow the frontend's actual origin, or browser requests use an incorrect origin or credentials configuration.

Solution: Configure Express CORS for the correct frontend domain and authentication method.

Problem 3: CloudFront keeps serving an old frontend build

Cause: Cached objects have not expired or been invalidated.

Solution: Use content-hashed asset filenames, appropriate cache headers, and targeted invalidations when needed.

Problem 4: EC2 backend stops responding

Cause: The process crashed, the instance ran out of resources, or networking and security rules are incorrect.

Solution: Monitor application logs, EC2 metrics, process health, and infrastructure alerts. Use an appropriate process manager and recovery strategy.

Problem 5: MongoDB connection fails

Cause: Incorrect credentials, network access restrictions, DNS issues, or connection limits.

Solution: Verify the connection string, Atlas network access, database user permissions, and outbound connectivity.

Problem 6: API requests receive 502 or 504 errors

Cause: Nginx cannot reach the backend, or the upstream service takes too long to respond.

Solution: Check PM2 logs, Nginx logs, backend health endpoints, and timeout settings.

13. Security and Production Best Practices

Before making your application publicly available, consider these practices:

AWS security

  • Use IAM roles instead of hardcoded AWS credentials.

  • Keep the S3 bucket private with CloudFront OAC.

  • Restrict EC2 security group rules.

  • Avoid exposing the Node.js application port publicly.

  • Store secrets in AWS Secrets Manager or Systems Manager Parameter Store.

Application security

  • Use HTTPS.

  • Validate incoming requests.

  • Configure CORS carefully.

  • Apply authentication and authorization on backend routes.

  • Never expose database credentials in frontend bundles.

Performance

  • Use CloudFront caching for static assets.

  • Enable compression where appropriate.

  • Use content-hashed filenames.

  • Optimize React bundle size.

  • Monitor EC2 CPU, memory, disk, and network usage.

Reliability

  • Configure application health checks.

  • Monitor CloudFront, EC2, and application logs.

  • Back up important database data.

  • Establish deployment rollback procedures.

  • Consider an Application Load Balancer and multiple EC2 instances when higher availability is required.

14. Is This Architecture Suitable for Every MERN Application?

Not necessarily.

S3, CloudFront, and EC2 provide a practical architecture for applications that need separately hosted frontend and backend services.

However, the right architecture depends on traffic, reliability requirements, operational complexity, and budget.

For example:

RequirementPossible AWS solutionStatic React hostingS3 + CloudFrontNode.js backendEC2Managed container deploymentECS + FargateServerless API operationsLambda + API GatewayManaged relational databaseRDSObject storageS3Global content deliveryCloudFrontSecrets managementSecrets ManagerMonitoringCloudWatch

For a small or medium-sized application, a single EC2 instance may be a reasonable starting point.

For a high-availability production system, consider multiple EC2 instances behind an Application Load Balancer, automated scaling, deployment automation, and stronger monitoring.

The objective is not to use every AWS service.

It is to choose the services that solve your actual application requirements.

Final Thoughts

Deploying a MERN application on AWS is not simply about uploading frontend files and starting a Node.js server.

It involves understanding how different infrastructure components communicate and how each service contributes to the complete application.

Amazon S3 stores and serves the frontend assets. CloudFront delivers those assets globally and routes requests to the appropriate origin. EC2 runs the backend application, Nginx forwards API requests, and MongoDB Atlas stores application data.

Once these components are configured correctly, you have a practical production architecture with independent frontend and backend deployments.

As full-stack developers, understanding deployment architecture is just as important as writing application code.

A production-ready application is not only one that works locally. It is one that can be deployed, secured, monitored, maintained, and scaled reliably.

About the Author

Asad Saeed | Senior Software Engineer | Full Stack Developer

I share practical insights on backend engineering, MERN Stack development, distributed systems, database architecture, cloud computing, and building reliable production applications.
Asad Saeed

Asad Saeed

Senior Software Engineer | Full Stack Developer

More posts →

Related Posts

Don't Stop Here

Docker for Full-Stack Developers: Complete Guide (2026)

Docker for Full-Stack Developers: Complete Guide (2026)

Learn Docker for full-stack development with practical examples covering Dockerfiles, images, containers, Docker Compose, networking, environment variables, volumes, and production deployment.

DOCKERDEVOPSSOFTWARE ENGINEERING
© 2026 · Asad Saeed
Oct 19, 202612 min read
Read
Dependency Injection in NestJS Explained: Providers, IoC Container, Injection Tokens & Custom Providers (2026 Guide)

Dependency Injection in NestJS Explained: Providers, IoC Container, Injection Tokens & Custom Providers (2026 Guide)

Learn how Dependency Injection works in NestJS, including Providers, the IoC Container, Constructor Injection, Injection Tokens, Custom Providers, and best practices for building scalable, testable, and enterprise-ready Node.js applications.

NESTJSDEPENDENCY INJECTIONNODEJS
Oct 19, 20265 min read
Read
NestJS Architecture Explained: Controllers, Providers, Modules, Middleware, Guards & Interceptors (2026 Guide)

NestJS Architecture Explained: Controllers, Providers, Modules, Middleware, Guards & Interceptors (2026 Guide)

Master the NestJS architecture by understanding Modules, Controllers, Providers, Dependency Injection, Middleware, Guards, Pipes, Interceptors, and Exception Filters. Learn the complete NestJS request lifecycle and build scalable, production-ready backend applications.

NESTJSNODEJSSOFTWARE ARCHITECTURE
Aug 5, 20266 min read
Read
F
Made with ❤️ by Asad Saeed
© 2026 · Asad Saeed
Made with ❤️ by Asad Saeed
F
Oct 19, 202612 min read
Read
Dependency Injection in NestJS Explained: Providers, IoC Container, Injection Tokens & Custom Providers (2026 Guide)

Dependency Injection in NestJS Explained: Providers, IoC Container, Injection Tokens & Custom Providers (2026 Guide)

Learn how Dependency Injection works in NestJS, including Providers, the IoC Container, Constructor Injection, Injection Tokens, Custom Providers, and best practices for building scalable, testable, and enterprise-ready Node.js applications.

NESTJSDEPENDENCY INJECTIONNODEJS
Oct 19, 20265 min read
Read
NestJS Architecture Explained: Controllers, Providers, Modules, Middleware, Guards & Interceptors (2026 Guide)

NestJS Architecture Explained: Controllers, Providers, Modules, Middleware, Guards & Interceptors (2026 Guide)

Master the NestJS architecture by understanding Modules, Controllers, Providers, Dependency Injection, Middleware, Guards, Pipes, Interceptors, and Exception Filters. Learn the complete NestJS request lifecycle and build scalable, production-ready backend applications.

NESTJSNODEJSSOFTWARE ARCHITECTURE
Aug 5, 20266 min read
Read
F
Made with ❤️ by Asad Saeed
© 2026 · Asad Saeed
Made with ❤️ by Asad Saeed
F